
Ikea Desk Hack – Rolling Desk with Power and Ventilation
Desk used: Ikea Hemnes Desk ($299 CAD)
Mods completed:
- Make desk easily moveable – put it on casters
- Add hidden power solutions for charging various gadgets:
- Recessed power brick with USB charging in drawer
- Pop-up power outlets with USB charging on desktop
- Affix dual monitor mount permanently
- Add temperature-controlled fans for airflow in cabinet while keeping external GPU / PC hidden hidden out of sight
- Add sexy RGB LED lighting (subjective)
After moving into our new duplex, this will be my first “real” project… well, the first one that I’m documenting anyway.
For those of you that have moved before, you know how it is, the necessities get unpacked first (e.g. cutlery, plates, booze and snacks), then everything else kind of just happens as it happens. This effect was kind of magnified in the thick of the pandemic. Do I really need that new underwear??
Links to products used in this video:
- Ikea Hemnes Desk – https://bit.ly/3suxkSI
- Casters: https://amzn.to/3AZvFYu
- Power Strip (drawer): https://amzn.to/2W7a5BZ
- Pop-up Desktop Power: https://amzn.to/2UxbQYK
- Fan temperature controller: https://amzn.to/3k8eddd
- Fan (had a spare fan from this kit but any USB powered fan would work): https://amzn.to/3gilYwb
- Hole saw kit (pop-up power required a bigger hole saw than I owned): https://amzn.to/3z30gDT
- Monitor mount: https://amzn.to/3mmbAY2
- Philips Hue LED strip (I had an old v1… any other option will do): https://amzn.to/3sBN5XV
- 3M Command Strips (used to secure main power brick): https://amzn.to/3xX2MtW
- Cable clips: https://amzn.to/3xX8Ouw
- Cable grommet: https://amzn.to/3zfTyKU
- Japanese Pull Saw (for stubborn dowels): https://amzn.to/3D2A5Q8
Pandemic or not, some spot always ends up getting designated as the dumping ground — the place that stores the questionables… the items that may very well stay packed until the end of time. Do I still need that Nintendo Wii box? Wonder what’s on all those burned DVD’s… I’m sure I’ll have a look through my grade 4 short story journals again… eventually.
For us, that place ended up being the spare bedroom. The space that is not for my second child — no, the two girls will learn to bunk and like it! That’s because this space was reserved. It was to be my office. Where shit would get done. And yes, this was to be my VR holodeck. But alas, this is what had become of that space…

After living here for nearly a year, this is pretty much how the space sat. We didn’t immediately need the space. But yes, it was time to finally get things sorted out. If I was to move along in my journey to level up my life, this would have to be my ground zero. The first step was to clean up the space into something that didn’t resemble the aftermath of a natural disaster.
The clean up part was easy. I just had to find a replacement location to put all the junk and for us, this ended up to be a combination of crawl space as well as putting up a bunch of storage cabinets on the wall. Having already used the Ikea Besta system for the entertainment units in both my previous condo as well as in my current duplex, I was already familiar with it so I went with that. What I like about the Besta is the modularity (you can design and piece it together however you like)–Ikea even has a configuration tool on their site. More importantly, the Besta, and Ikea things in general, are relatively inexpensive. Yes, the innards might literally be made out of cardboard, but they do what I need them to, which is mainly to hide my crap without looking like crap. Did I mention they were also relatively inexpensive?
This post, nor the related YouTube video are sponsored by Ikea in any way, by the way. Everyone generally knows what they’re getting with the blue and yellow furniture chain, which is affordability and a mini project that may very well lead to frustration (as you’ll read later).
Now that the space was cleaned up, the next priority was getting a desk in. Normally, this would entail shopping trips, but for me this started with a dilemma. Do I build the desk, or do I buy it? Because of the pandemic (and having more space in my duplex compared to my one-bedroom condo), I had accumulated a bunch of new power tools thinking I’d be the next Mike Holmes. Well… not really, but all of a sudden I did have an itch to build stuff. I had already “successfully” completed two woodworking projects in building a rolling cart and our dining table, so my confidence was increasing. I say “successfully” because there were plenty of problems encountered along the way, some still persisting to this day.


For my first YouTube video, I decided it would be better to take baby steps and buy a desk to modify instead of building from scratch. Less chance for things to go wrong, right? Right??! Of course not…
Priorities for desk:
- Put casters on to be able to wheel around desk easily (what good is a VR Holodeck if there’s a big desk in the way to bang your shins into?)
- Add power options to charge various gizmos and gadgets
- Have enough space inside to house a PC or external GPU / Graphics dock
- Add fans to ensure electronics stay cool
- Affix monitor mount permanently
- RGD LED lighting (obviously)
First place I think of when I think of furniture is… you guessed it… Ikea (seriously… not sponsored, I swear!). Since I was looking for a desk that I intended to hack away at, of course I didn’t want to spend too much money! There was a very good chance of things going horribly, absolutely terribly awry and I didn’t want the $$$ hanging over my head.
After quick search I found exactly what I was looking for in the Hemnes Desk (don’t ask me how to pronounce it). Hemnes is one of the rare lines at Ikea that actually uses real wood–pine in this case. It’s a softwood and won’t be the most durable, but that’s not my priority. Cheap and good enough is what I’m looking for! This is my first project on my FPA adventure after all!

The Hemnes desk had exactly what I was looking for:
- Two sides with ample storage:
- Left side cabinet to house my external GPU or PC
- Right side drawers to mod with power outlets
- Wood legs that can be chopped off and replaced with casters
I picked up some casters off Amazon. Since the legs of the desk were thinner posts, I decided to go with casters with stem mounts — the ones I bought came with threaded inserts that I could insert into the desk legs and screw the casters directly into.

One thing I neglected to notice or pay attention to (among many!) was the fact that the desk actually had eight legs. There are four legs to support the inner parts of the side cabinets. If I wanted to have the desk roll around easily without these inner legs scraping the floor, I had to make sure that the casters (on the 4 outside legs) were higher than these inner legs. The only question was whether or not the inner legs were necessary for supporting the desk (more on that later). Now it was time to get to work.
Tools Used:
- Circular saw
- Jigsaw
- Drill & Impact Driver
- Hammer
- Dremel Multi Max
- Box Level (not necessary, just to check desk frame squareness)
- Hole Saw Set
- Eye Protection
- Ruler (from combination square)
- Framing square (to guide my cuts)
- Screwdriver
- Pencil
Products Purchased for Mods:
- Ikea Hemnes Desk
- Stem Casters
- Huanuo Dual Monitor Mount
- 3M Command Large Picture Hanging Strips
- Recessed Power Strip
- Pop-up Power Outlet Strip
- AC Infinity Fan & Thermal Controller
- Cable Clips
- Desk Grommets
I cut off 3″ from each outer leg with my circular saw to accommodate the casters. This would ensure that the inner legs would be off the ground so that the casters could move freely.

My “workshop” is pretty much the floor of my garage… I’ll be working on getting this space organized in the future, so stay tuned. To protect my saw blade and my concrete floor I’m making my cuts on top of a piece of foam insulation with the saw blade lowered just a tiny bit below the work piece.
After the cuts were made, I needed to get the threaded inserts into the leg so that the casters could be screwed in. Unfortunately the casters that I bought didn’t come with any instructions (like what size hole to drill) so I ended up messing up the first leg slightly by initially drilling too small a hole. Thankfully this was an easy fix (go a size higher) and only caused a slight headache. In a situation like this, I would definitely recommend testing the hole on the piece of wood that was cut off the leg first.
Of course, the mistakes don’t end there! I got a bit too confident after finding the right drill bit size that I started working a bit too fast and ended up powering a threaded insert too deep into the leg, causing the wood to split… I ended up putting some wood glue in the crack and clamping it down when the desk was complete and it seems to be holding up just fine.

That was pretty much it for the casters as they just had to be screwed into the threaded inserts at this point. The casters I bought on Amazon came with a set of wrenches to make the final turns to make sure they were snug.
Now it was time to start putting the desk together. As I was following Ikea’s always awesome instructions I noticed that Ikea did a few things to make my life a bit easier with respect to my mods and cable management. First, both the cabinet and drawer sides had holes pre-cut so that cables could easily pass through. Second, there is a built in shelf at the back to rest the cables and/or power brick on. Third, there is a gap between the back of the drawers and the actual back of the desk, so additional cables/items could be hidden behind without affecting desk movement.


Unfortunately, what I had feared regarding the casters and inner legs of the desk had actually come true. Since my casters were slightly raised compared to the inner legs of the desk, a slight sag was introduced (confirmed with my box level). The damage was already done at this point (i.e. I had cut the legs off) so I had to continue. My hope was that as soon as I put on the actual desktop, this would provide some extra rigidity needed to keep everything square. Before putting the desktop on, however, it was time to put in some power.

The first item to install was the recessed power strip. One of the images in the Amazon listing provided the measurements for the cut, so it was simply a matter of marking off where I wanted the power strip to sit and making the cuts with my jigsaw. To make the jigsaw cuts, I first drilled holes in two corners of the rectangle so that I could plunge my blade in and start the cuts from the corners. Once that was done, it was simply a matter of screwing the power strip in and cleaning up the cables with cable clips.


For the main power strip/surge protector that everything would plug into, I was originally going to mount it with screws, but I had just scored an awesome deal on some 3M Command Strips so I took the easy/clean way out. Two strips seems to have done the trick nicely. Another benefit of using the Command Strips (also not sponsored) is that if for whatever reason I decide to swap out surge protectors in the future, they’re simple to remove and non-destructive (i.e. I won’t be left with random holes in the wood).


After testing that power was working properly, it was time for the moment of truth… the desktop was to go on next. This would determine whether or not my “simple” caster mod would need to go into next level territory… and of course things did not go smoothly. No matter what I tried, the desktop would not seat correctly onto the desk base. And yes, even though it was probably ill-advised, I did even try to sit on it. All 200+ lbs of me. But nada… I figured it was due to the sag throwing things off but I actually tried everything upside down (i.e. desktop on the ground and putting the desk base on top), but nothing was working. At this point I was at a loss… Was my first project doomed already?
Upon taking a closer look, I noticed that one of the dowels on the desk base was a good 1/2″ higher than all the other ones. I tried to hammer it down, but that didn’t work. I tried to take it out, but at this point it was pretty stuck in there, even when using pliers. Taking an even closer look, conveniently, right where the dowel was located was a knot in the wood… I can only assume that Ikea’s mass production dowel hole driller thingamajig was not set up to expect knots in the dowel location, and thus did not make it to the proper depth. My only hope was to try to cut the dowel down to size and hope for the best.


It worked!11!! It was a dowel all along that had set me back… not my own incompetence as initially suspected. A dowel!! I did what any sane person would do and burned that excess dowel piece to the ground… muahahahaha!!!!! I’m not crazy, you’re crazy. But on a more serious note, this is what’s possible with Ikea stuff. It’s inexpensive but you may very well tear your hair out trying to put things together (though I’ve never run into something like this before… a freaking dowel!). With the desktop secured, the sagging issue was also solved and the desk was rolling around freely. Phew!
With the desk now fully assembled, I could complete the rest of my modifications. Next up was affixing the dual monitor mount, which was relatively simple. The model I had purchased had two mounting options, you could either clamp it the desktop or drill a hole and affix it permanently. Since I intended on moving the desk around fairly regularly, I felt it was best to have it as secure as possible so went with the permanent install.


For cable management, I drilled a hole at the back of the desk using a 2″ hole saw to feed the cables through and affixed a grommet with cover to clean it up. The monitor mount had built in cable management as well so I just twisted the cables together at the bottom to bundle them up.


I still wasn’t quite done with power, however. Since there was a sizeable gap between the rear side of the drawers and the actual back of the desk I figured I might as well make use of that space! I checked out Amazon for some pop-up power strips and it seemed that the smallest hole size for them was bigger than the biggest hole saw I had at 2 1/8″. So obviously I had to shop for bigger hole saws to add to my growing collection as well lol. When the items arrived, it was simply a matter of choosing where to install and cutting out the hole. To make sure I had enough clearance I made sure to mark the area off from the bottom of the desktop and start drilling from there. Naturally there was a mistake made in the process–after drilling my hole cleanly I pulled the trigger of my drill while taking it out and damaged the top finish of the desktop… thankfully the trim of the pop-up power strip covered my carelessness…


Next up was ventilation in the cabinet where I would be putting my external GPU (for now) or desktop PC (later). I picked up an AC Infinity cabinet fan with temperature controller to do the job. For this project a simple temperature controller was enough (they have more elaborate products with LCD screens). There are four temperature settings and a thermal probe. You then pick what temperature you’d like the fans to turn on at (92 degrees F in my case) and when the thermal probe hits that temp inside the cabinet, the fans kick in–when below the set temp, they’ll turn off. Install was simple as they provide templates for marking off the hole you need to cut. I used a Dremel Multi Max for this job, but could have easily used a jigsaw or even handsaw as the back is actually just a thin panel.


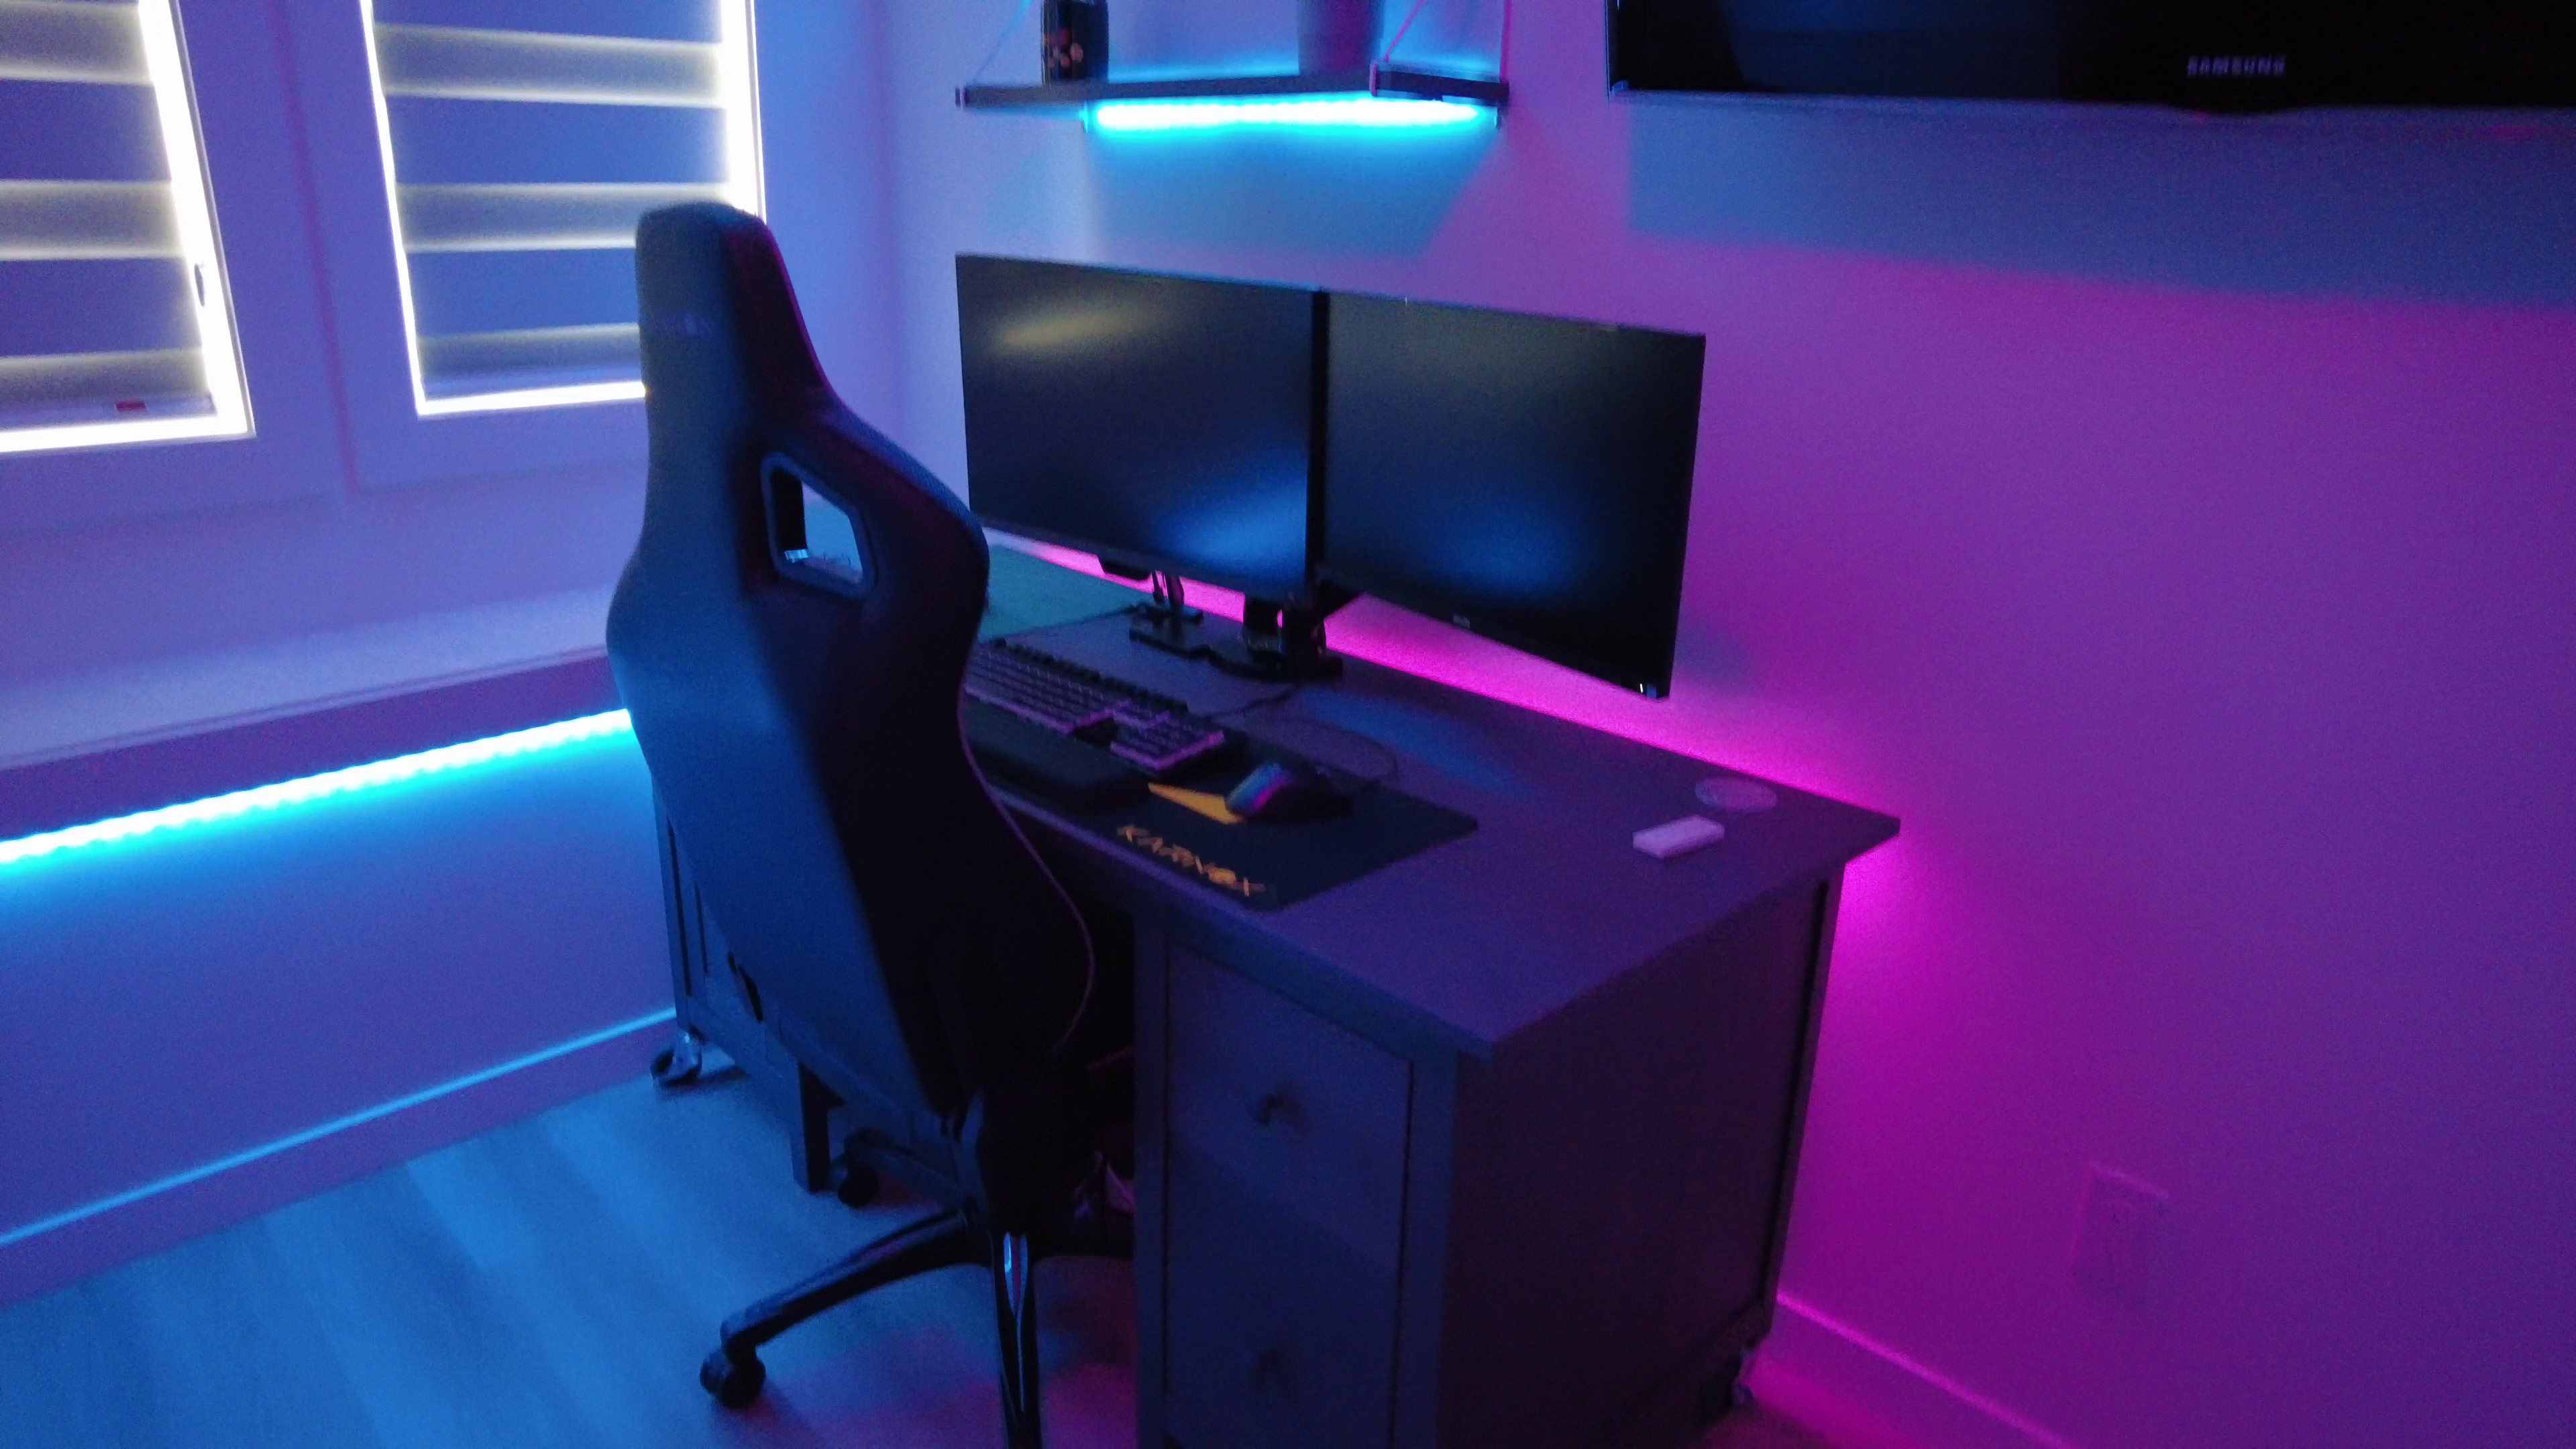
And that completes the desk! I definitely made some mistakes but learned a lot during the process. I’m super happy how everything turned out! Having the power strips hidden but easily accessible and plentiful is super convenient. Being able to wheel the desk around easily on the casters also fits my use perfectly–I can move it around depending on how I want to film a vid or if I want to play some VR (I really wasn’t kidding about the Holodeck…).
All that was left at this point was to light everything up light a Christmas tree (or GTA Vice City :P). The back of the desk had a perfect lip to stick some LEDs on. I used a spare Philips Hue lightstrip that I hadn’t got around to placing since we moved that fit the bill nicely. Of course I couldn’t just stop myself there and ended up putting more lights in the surrounding area.

And that’s it for my first project ever for my YouTube channel and this blog. Hope you enjoyed going through the process with me. I honestly barely had any experience doing this kind of thing — yes, it definitely got intimidating at times and there were points that I thought I might just have to quit (e.g. when one of the legs split and when the desk top would not seat on to the base). I stuck with it though and am super happy with the results. If any of you out there are in a similar position experience wise, just know that this putz did it, so you probably can too!
Cheers!
FTC // Some links may be affiliate links. This means that if you purchase items through these links, I will receive a commission. This is a no cost way to support my site and is 100% awesome of you.


1 Comment
Excellent, despite the mistakes along the way. I would have added castors to all 8 legs myself, but you got your four to work so fair enough.
I have the same desk and this has inspired me to extend the use of this workhorse, in particular adding a dual monitor mount and an power outlet.